0x04 验证技巧
走到这一步的大哥们都已经编好了自己的shellcode,开始磨刀霍霍向牛羊了,这里介绍两种常用的检查shellcode功能的方法,内联汇编和函数指针。
0x0 关闭栈不可执行因为在测试时,shellcode在bss段,在关闭NX编译选项之后bss段也拥有了可执行属性,具体操作如下。
注意在编译的时候加上 -z execstack
gcc -o test test.c -z execstack


在linux 下的c语言中主要采用的是 att格式的汇编,这里有个坑,一开始没接触c内联att格式汇编的小盆友们要注意了jmp eax的写法为jmp *%rax
#include<stdio.h>
char shellcode[] = "\xb8\x01\x00\x00\x00\xbf\x01\x00\x00\x00\xeb\x0a\x5e\xba\x05\x00\x00\x00\x0f\x05\xeb\x0b\xe8\xf1\xff\xff\xff\x48\x65\x6c\x6c\x6f\x0a\xb8\x3c\x00\x00\x00\xbf\x00\x00\x00\x00\x0f\x05";
int main(int argc, char **argv)
{
        __asm__("lea shellcode,?x;jmp *%rax");
       return 0;
}
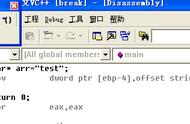
如图中代码所示,rip已经指向jmp rax指令此时的rax就是shellcode那段字符串的地址。因为这段内存拥有可执行,最后成功执行shellcode。

第二种方法大同小异,也是将shellcode放在程序的bss段上,利用之前的编译指令编好后调试。
#include<stdio.h>
#include<string.h>
unsigned char shellcode[] = "\xb8\x01\x00\x00\x00\xbf\x01\x00\x00\x00\xeb\x0a\x5e\xba\x05\x00\x00\x00\x0f\x05\xeb\x0b\xe8\xf1\xff\xff\xff\x48\x65\x6c\x6c\x6f\x0a\xb8\x3c\x00\x00\x00\xbf\x00\x00\x00\x00\x0f\x05";
int main(void)
{
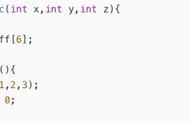
int (*func)() = (int(*)())shellcode;
func();
}