计算机二级必备干货——Word文字处理篇(2)


分享兴趣,传播快乐,增长见闻,留下美好!亲爱的您,这里是LearningYard新学苑。今天小编为大家带来计算机二级必备干货——Word文字处理篇(2)。
页眉页脚考点
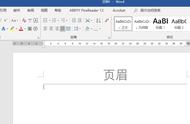
001.插入统一的页眉页脚
【插入】选项卡→【页眉和页脚】组→点击【页眉】/【页脚】选择对应的内置样式(或直接双击页面顶端/底端→直接进入页眉页脚编辑状态。
001. Insert uniform header footer
[Insert] TAB → [Header and footer] group → Click [Header] / [footer] to select the corresponding built-in style (or double-click the top/bottom of the page directly → directly enter the editing state of the header and footer.
002.插入空白三栏型的页眉
【插入】选项卡→【页眉和页脚】组→选择【空白(三栏)】。
002.insert a blank three-column header
Insert TAB → Header and Footer group → Select Blank (three columns).
003.为页眉添加特殊内容
页眉上的内容不仅可以添加文字,还可以添加logo、添加/删除其下方的横线、添加文档部件中的域等。
①添加/删除横线
选中页眉上方的所有内容(包括段落标记)→点击【段落】组→【边框和底纹】→点击【自定义】→分别设置线型、颜色、宽度→右边【预览窗格】设置横线位置。
删除页眉横线:直接选中也没中的所有内容设置边框为无框线。
②自动页眉
打开页眉→【文档部件】→【域】→选择【链接和引用】→【StyleRef】→【样式名】处选择对应的样式(一般情况下选择“报告标题1”)
特别提醒:需要插入章节号则再次插入域,勾选插入段落标号。
003. Add special content to the header
Content on the header can add not only text, but also logos, lines below them, fields in document parts, and so on.
① Add/delete horizontal lines
Select all content above the header (including paragraph markers) → Click [Paragraph] Group → [Border and Shading] → Click [Custom] → Set line, color and width respectively → set horizontal line position on the right [Preview pane].
Delete header line: Directly select all content that is not in and set the border to unframed.
② Automatic header
Open header → document Parts → Fields → Select links and references → StyleRef → Style Name select the corresponding style (in general, select "Report Title 1")
Special reminder: If you need to insert a section number, insert the field again, check the insert paragraph number.
004.奇偶页不同
在书籍编排过程中,由于装订问题,在给文档设置页眉页脚时,通常奇数页和偶数页的对齐方式时不一样的。
特别提醒:勾选奇偶页不同后,偶数页内容会自动消失,在偶数页重新插入对应内容即可。
004. Odd pages are different
In the process of book compilation, due to binding problems, when setting the header and footer of the document, the alignment of odd and even pages is usually different.
Special reminder: after checking the difference between even and odd pages, the contents of even pages will disappear automatically, and the corresponding contents can be re-inserted in even pages.
005.不同章节显示不同内容
此处页眉的核心操作思路:先分节,再 取消链接,最后再修改。
此处页码的核心操作思路:先插入页码,再设置页码格式。
先将文档进行分节:【布局】选项卡→点击【分隔符】→【下一页】。
分节后光标定位在新节的页眉页脚初→取消【链接到前一页】→输入内容。
特别提醒:题目如果要求每一章都从奇数页开始,选择插入【奇数页分节符】。
005. Different chapters display different contents
The core operation idea of the header here is: first section, then unlink, and finally modify.
The core operation idea of the page number is as follows: Insert the page number first and then set the page number format.
First, divide the document into sections: [Layout] TAB → click [Separator] → [Next page].
After segmenting, the cursor is positioned at the beginning of the footer of the header of the new section → cancel [link to previous page] → Enter the content.
Note: if the topic requires that each chapter begin with an odd number of pages, select "odd number of pages".
006.页码
打开页眉页脚→【页眉和页脚】组点击【页码】→选择页码的位置→【设置页码格式】(编号格式、页码编号)。
006. The page number
Open header footer → [Header and footer] group click [page number] → select the position of the page number → [Set page number format] (number format, page number).
007.编辑页码代码
插入页码后→选中页码按快捷键【Shift F9】→剪切总页数的域代码→【Ctrl F9】插入域→输入“=”粘贴域代码→紧接着输入“-1”。
007. Edit the page number code
After inserting the page number, select the page number and press the shortcut key [Shift F9], cut the field code for the total number of pages, [Ctrl F9] insert the field, enter "=" to paste the field code, and then enter "-1".
如果您对今天的文章有独特的想法,欢迎给我们留言,让我们相约明天,祝您今天过得开心快乐!
END
参考资料:百度百科、谷歌翻译。
本文由LearningYard新学苑原创,部分图片及文字来源于网络,若有侵权请联系删除。
,