这样 Android 侧的 View 就可以接收到事件了。
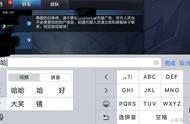
4.2.2 Unity侧点击事件处理通过以上方法解决了 Andorid 侧无法获取点击事件的问题,但如上图所示,Unity 侧还是会收到事件,这样会触发一些 Unity 的点击逻辑。这是所有人都不希望的,最后在王者团队和阿波罗团队讨论后,采用 Unity 官方论坛的一条解答方案对此问题进行了解决:
在展示 android 页面时,在 Unity 侧添加一个蒙版,Untiy 此时不处理该事件,而是直接转移到 Android 侧。来源:
http://answers.unity3d.com/questions/829687/android-plugin-touch-issues-with-forwardnativeeven.html The answer goes the same as in this question: "You have two possible solutions here: create a separate window for your view, for example a Dialog; create your own activity which shows your view. The reason is that UnityPlayerNativeActivity consumes all these events, because the input loop is associated with Unity window." |
王者在 Andorid 侧采用了沉浸式模式,沉浸式在显示界面上,默认情况下是全屏的,状态栏和导航栏都不会显示。而当需要用到状态栏或导航栏时,只需要在屏幕顶部向下拉,或者在屏幕右侧向左拉,状态栏和导航栏才会显示出来,此时界面上任何元素的显示或大小都不会受影响。过一段时间后如果没有任何操作,状态栏和导航栏又会自动隐藏起来,重新回到全屏状态。
举例来说非沉浸式,部分沉浸式(状态栏隐藏),完全沉浸式:


很多 Android 手机是有虚拟按键的,但效果上打开王者荣耀的效果,边缘的虚拟按键以及顶部的状态栏都是不显示的。这里有两个小细节,如下:
- 屏幕宽高
获取屏幕宽高,一开始是通过上面提到的方法获得:
WindowManager wm = this.getWindowManager();
ScreenUtils.width = wm.getDefaultDisplay().getWidth();
ScreenUtils.height = wm.getDefaultDisplay().getHeight();
在王者没有设置沉浸式模式的时候,是没有问题的。但该宽高是不包括虚拟按键的宽高的,这就导致王者在设置沉浸式以后,出现显示不全屏的问题,边上少了一块。
那我们看一下如何设置沉浸模式:
public class MainActivity extends AppCompatActivity {

    @Override
    protected void onCreate(Bundle savedInstanceState) {
        super.onCreate(savedInstanceState);
        setContentView(R.layout.activity_main);
    }

    @Override
    public void onWindowFocusChanged(boolean hasFocus) {
        super.onWindowFocusChanged(hasFocus);
        if (hasFocus && Build.VERSION.SDK_INT >= 19) {
            View decorView = getWindow().getDecorView();
            decorView.setSystemUiVisibility(
                View.SYSTEM_UI_FLAG_LAYOUT_STABLE
                | View.SYSTEM_UI_FLAG_LAYOUT_HIDE_NAVIGATION
                | View.SYSTEM_UI_FLAG_LAYOUT_FULLSCREEN
                | View.SYSTEM_UI_FLAG_HIDE_NAVIGATION
                | View.SYSTEM_UI_FLAG_FULLSCREEN
                | View.SYSTEM_UI_FLAG_IMMERSIVE_STICKY);
        }
    }

}
其实也是通过 Activity 的 DecorView 进行设置的沉浸模式,那 DecorView 的宽高肯定在该处也会变成全屏大小了,通过测试确实如此,由此也解决了显示少一部分区域的问题。
- WindowManager
现在王者荣耀里有很多其他的原生页面(Android/ios),使用的是 webview 进行显示独立的信息。譬如说英雄传说,世界起源等页面,在目前的展示上似乎没有达到沉浸式的效果,这里方法上根据一些相关团队的研发介绍,应该是通过WindowManager 的方式添加的,做了一些测试,但没有达到需要的效果。
以下是通过添加 WindowManager 的方法:
WindowManager windowManager = activity.getWindowManager();
            if (mScene.getParent() != null) {
                windowManager.removeView(mScene);
            }
            try {
                windowManager.addView(mScene, params);
            } catch (WindowManager.BadTokenException e) {
                e.printStackTrace();
            } catch (WindowManager.InvalidDisplayException e) {
                e.printStackTrace();
            }

public WindowManager.LayoutParams createLayoutParams(int left, int top, int width, int height) {
        WindowManager.LayoutParams windowParams = new WindowManager.LayoutParams();
        windowParams.gravity = Gravity.LEFT | Gravity.TOP;
        windowParams.flags = windowParams.flags
                | WindowManager.LayoutParams.FLAG_IGNORE_CHEEK_PRESSES
                | WindowManager.LayoutParams.FLAG_NOT_TOUCH_MODAL
                | WindowManager.LayoutParams.FLAG_LAYOUT_IN_SCREEN
                | WindowManager.LayoutParams.FLAG_HARDWARE_ACCELERATED
                | WindowManager.LayoutParams.FLAG_FULLSCREEN
                | WindowManager.LayoutParams.FLAG_TRANSLUCENT_STATUS
                | WindowManager.LayoutParams.FLAG_TRANSLUCENT_NAVIGATION;
        windowParams.width = width;
        windowParams.height = height;
        windowParams.x = left;
        windowParams.y = top;
        windowParams.format = PixelFormat.TRANSLUCENT;
        windowParams.softInputMode |= WindowManager.LayoutParams.SOFT_INPUT_IS_FORWARD_NAVIGATION;
        if (mActivityReference.get() != null) {
            windowParams.type = WindowManager.LayoutParams.TYPE_APPLICATION;
        } else {
            windowParams.type = WindowManager.LayoutParams.TYPE_SYSTEM_ALERT;
        }
        windowParams.systemUiVisibility = View.SYSTEM_UI_FLAG_HIDE_NAVIGATION;

        return windowParams;
    }
添加的方式我们请教了相关开发人员。后面添加了些代码,想以此去解决虚拟按键显示的问题,如上图所示,进行了一些尝试:
WindowManager.LayoutParams.FLAG_TRANSLUCENT_NAVIGATION;

windowParams.systemUiVisibility = View.SYSTEM_UI_FLAG_HIDE_NAVIGATION;
这起到了一定的效果,但在有虚拟按键的手机上,进入页面后会先闪一下虚拟键盘然后消失,体验上不够好。我们通过 DecorView 方式进行添加,则不存在该问题,因此,也就没有更换方案。
这里还是蛮有意思的,感兴趣的开发者可以想一下解决方案。WindowManager 的方案是不需要考虑点击事件传递的,这一点对于方案来说应该是更方便,方案迁移上也更好。
4.4 Android 点9图功能支持这个课题很有意思,如何将一张普通图片以点 9 的形式提供拉伸、缩放的能力?
Unity 里提供了大量的类似使用方式,只提供普通图和拉伸点,来实现拉伸效果。这种方式也很快在 ios 里得到了验证和实现。而在 android 里,如何做到这种效果呢?
一张普通的图如何实现点9的效果,网上的解答基本都是从 NinePatch 的原理讲起,反向推导输出方案。
这一块其实可以看一下点9图的编译过程,也是很有意思。最后编译后的图并不是点 9,而是一张 png 图片,并且携带了 ninepatchConfig 的信息。那么此时的思路其实就是伪造一份 NinePatchConfig,就可以实现普通图的效果了。
再看 NinePatchDrawable 的构造方法:
/**
     * Create drawable from raw nine-patch data, setting initial target density
     * based on the display metrics of the resources.
     */
    public NinePatchDrawable(Resources res, Bitmap bitmap, byte[] chunk,
            Rect padding, String srcName) {
        this(new NinePatchState(new NinePatch(bitmap, chunk, srcName), padding), res);
    }
其实,支持这一思路的可行性,只需要构造 chunk 的二进制流,就可以伪装成点 9 图的效果。
拿到一张点 9 图,android 是通过 NinePatch 进行处理,点 9 图无非是在普通图上打几个点,作为拉伸的依据,即 NinePatchConfig,然后交由 Native 层进行处理,NInePatch 的代码不多:
// NinePatch chunk.
class NinePatchChunk {

    public static final int NO_COLOR = 0x00000001;
    public static final int TRANSPARENT_COLOR = 0x00000000;

    public Rect mPaddings = new Rect();

    public int mDivX[];
    public int mDivY[];
    public int mColor[];

    private static void readIntArray(int[] data, ByteBuffer buffer) {
        for (int i = 0, n = data.length; i < n;   i) {
            data[i] = buffer.getInt();
        }
    }

    private static void checkDivCount(int length) {
        if (length == 0 || (length & 0x01) != 0) {
            throw new RuntimeException("invalid nine-patch: "   length);
        }
    }

    public static NinePatchChunk deserialize(byte[] data) {
        ByteBuffer byteBuffer =
                ByteBuffer.wrap(data).order(ByteOrder.nativeOrder());

        byte wasSerialized = byteBuffer.get();
        if (wasSerialized == 0) return null;

        NinePatchChunk chunk = new NinePatchChunk();
        chunk.mDivX = new int[byteBuffer.get()];
        chunk.mDivY = new int[byteBuffer.get()];
        chunk.mColor = new int[byteBuffer.get()];

        checkDivCount(chunk.mDivX.length);
        checkDivCount(chunk.mDivY.length);

        // skip 8 bytes
        byteBuffer.getInt();
        byteBuffer.getInt();

        chunk.mPaddings.left = byteBuffer.getInt();
        chunk.mPaddings.right = byteBuffer.getInt();
        chunk.mPaddings.top = byteBuffer.getInt();
        chunk.mPaddings.bottom = byteBuffer.getInt();

        // skip 4 bytes
        byteBuffer.getInt();

        readIntArray(chunk.mDivX, byteBuffer);
        readIntArray(chunk.mDivY, byteBuffer);
        readIntArray(chunk.mColor, byteBuffer);

        return chunk;
    }
}
由此反向寻求解决方案,将打的上下左右的点去反推二进制数据的构造方法。但实际使用时,没有达到理想的效果。上面两个开源项目是 StackOverflow 里提的比较多的,第二个开源项目中的核心代码:
public class NinePatchBitmapFactory {

    // The 9 patch segment is not a solid color.
    private static final int NO_COLOR = 0x00000001;

    // The 9 patch segment is completely transparent.
    private static final int TRANSPARENT_COLOR = 0x00000000;

    public static NinePatchDrawable createNinePathWithCapInsets(Resources res, Bitmap bitmap, int top, int left, int bottom, int right, String srcName) {
        ByteBuffer buffer = getByteBuffer(top, left, bottom, right);
        NinePatchDrawable drawable = new NinePatchDrawable(res, bitmap, buffer.array(), new Rect(), srcName);
        return drawable;
    }

    public static NinePatch createNinePatch(Resources res, Bitmap bitmap, int top, int left, int bottom, int right, String srcName) {
        ByteBuffer buffer = getByteBuffer(top, left, bottom, right);
        NinePatch patch = new NinePatch(bitmap, buffer.array(), srcName);
        return patch;
    }

    private static ByteBuffer getByteBuffer(int top, int left, int bottom, int right) {
        //Docs check the NinePatchChunkFile
        ByteBuffer buffer = ByteBuffer.allocate(56).order(ByteOrder.nativeOrder());
        //was translated
        buffer.put((byte)0x01);
        //divx size
        buffer.put((byte)0x02);
        //divy size
        buffer.put((byte)0x02);
        //color size
        buffer.put(( byte)0x02);

        //skip
        buffer.putInt(0);
        buffer.putInt(0);

        //padding
        buffer.putInt(0);
        buffer.putInt(0);
        buffer.putInt(0);
        buffer.putInt(0);

        //skip 4 bytes
        buffer.putInt(0);

        buffer.putInt(left);
        buffer.putInt(right);
        buffer.putInt(top);
        buffer.putInt(bottom);
        buffer.putInt(NO_COLOR);
        buffer.putInt(NO_COLOR);

        return buffer;
    }

}
我们看一个简单的示例: